How to Repair a Window Screen (Patch, Replace & Frame Fix): The Definitive 2025 Guide
Learning how to repair a window screen is one of the most cost-effective DIY projects you can tackle. A torn screen is a nuisance, but a complete replacement can be expensive—often costing $75-150 per screen when professionally done. The good news? With the proper knowledge and tools, you can master window screen replacement and repair for a fraction of that cost.
Video Title: “How to Repair a Window Screen: A Complete Step-by-Step Guide”
Source ” How to Repair or Replace Screens “
In this definitive pillar guide, we’ll cover every aspect of window screen repair. We’ll walk you through patching small holes, doing a complete mesh replacement, and even fixing the frame itself. Whether you’re dealing with a tiny puncture from your cat’s claws or a screen that’s completely shredded from years of weather exposure, this is the only guide you’ll need.
Do you Live in the Houston area and prefer to have an expert handle it? Our mobile team offers same-day window screen repair and replacement. Get your free quote now!
Table of Contents
- First, Assess the Damage: Choosing Your Window Screen Repair Method
- Method 1: How to Patch a Window Screen (The 5-Minute Fix)
- Method 2: How to Repair a Window Screen by Replacing the Mesh
- Method 3: How to Repair a Window Screen Frame
- FAQ: Your Top Questions on How to Repair a Window Screen
- Conclusion: Your Successful Window Screen Repair
First, Assess the Damage: Choosing Your Window Screen Repair Method
Before diving into any repair, you need to properly assess what you’re dealing with. This section acts as your roadmap for the rest of this guide, helping you choose the most effective approach for your specific situation.
Patch It If:
- The hole is smaller than your fist
- The screen mesh is otherwise in good condition
- You need a quick, temporary fix
- The damage is isolated to one small area
This is the quickest way to repair a window screen—often taking just 5-10 minutes.
Replace the Mesh If:
- The screen has large tears or multiple holes
- The mesh is brittle from sun damage or age
- You want to upgrade to a more durable material
- The existing screen has significant sagging
A full DIY window screen replacement provides the most durable, long-lasting result.
Fix the Frame If:
- The mesh is intact but the metal frame is bent
- The corners are broken or separated
- The frame no longer sits properly in the window
- The spline groove is damaged
| Damage Type | Repair Method | Time Required | Skill Level |
|---|---|---|---|
| Small holes (<2 inches) | Patch | 5-10 minutes | Beginner |
| Large tears/multiple holes | Full mesh replacement | 30-60 minutes | Intermediate |
| Bent/broken frame | Frame repair | 15-45 minutes | Intermediate |
| Complete deterioration | Full replacement | 45-90 minutes | Advanced |
Method 1: How to Patch a Window Screen (The 5-Minute Fix)
When you’re dealing with small holes or tears, patching is your fastest and most economical solution. We’ve repaired hundreds of screens over the years, and for holes smaller than a quarter, a quality patch can last just as long as the original screen material.
What You’ll Need:
- Adhesive patch kit (available at hardware stores for $3-8)
- Scissors
- Clean cloth
- Rubbing alcohol (optional, for cleaning)
Quick Patching Process:
- Clean the damaged area with a damp cloth to remove dirt and debris
- Cut your patch to be about 1/2 inch larger than the hole on all sides
- Remove the adhesive backing and carefully position the patch
- Press firmly for 30 seconds, working from center outward
- Smooth out air bubbles with your finger or a credit card edge
Pro Tip: For the most invisible repair, try to match the patch material to your existing screen. Clear patches work well on most screens, but gray or black patches blend better with darker mesh.
The key to a successful patch is ensuring the screen is completely clean and dry before application. Even a small amount of dust or moisture can prevent proper adhesion, leading to patch failure within weeks.
For a full comparison of different patch styles and adhesive types, read our complete guide to the Top 5 Best Window Screen Repair Kits.
Method 2: How to Repair a Window Screen by Replacing the Mesh
This is the most comprehensive section of our guide, as complete mesh replacement is the most common major repair homeowners tackle. When done correctly, a DIY window screen replacement can look professional and last for years.
Tools & Materials Checklist for a Full Screen Repair
Having the right tools makes the difference between a frustrating afternoon and a smooth, professional-looking repair. Here’s everything you’ll need:
Essential Materials:
- New Screen Mesh
- Fiberglass: Most common, affordable ($0.50-1.00 per sq ft)
- Aluminum: More durable, better for high-traffic areas ($1.00-1.50 per sq ft)
- Pet-proof: Heavy-duty for homes with cats/dogs ($2.00-3.00 per sq ft)
The material you choose has a big impact on durability and visibility. Before you buy, explore our detailed comparison: Fiberglass vs. Aluminum vs. Pet-Proof Screen: Which is Right for You?
- Spline (Screen Cord)
- Must match your frame’s groove width exactly
- Common sizes: .155″, .175″, .200″, .250″
- Buy 10% extra—better to have too much than run short
Using the correct spline size is the secret to a professional result. Learn how to measure it in our guide: How to Choose the Correct Spline Diameter for Your Window Screen Repair.
Required Tools:
- Spline roller tool (convex and concave wheels)
- Utility knife with fresh blade
- Flat-head screwdriver
- Scissors
- Measuring tape
- Work surface (table or sawhorses)
Don’t want to buy all the tools for a one-time fix? Our technicians arrive with everything needed to repair your screens on the spot. Learn more about our mobile window screen services in Houston.
Step-by-Step Guide: Your First DIY Window Screen Replacement
Follow these steps carefully, and you’ll achieve professional-quality results. We’ve refined this process through thousands of repairs, and these details make all the difference.
What Makes Our Pet-Resistant Screens Different?
Step 1: Remove the Frame and Prepare Your Workspace
Start by carefully removing the screen from your window. Most screens lift out easily, but some may have springs or clips holding them in place.
Set up a clean, flat work surface that’s larger than your screen frame. A dining room table covered with a towel works perfectly. Good lighting is crucial—you’ll be working with small details, and proper visibility prevents mistakes.
Step 2: Pry Out the Old Spline and Remove the Damaged Screen
Using your flat-head screwdriver, carefully pry up one end of the spline. Once you get it started, you can usually pull the entire length out by hand. The spline holds the screen mesh in the frame’s groove, so removing it will release the old screen material.
Important: Examine the old spline as you remove it. If it’s still flexible and not cracked, you can reuse it. However, spline that’s been in place for several years often becomes brittle and should be replaced.
Step 3: Lay the New Screen Mesh Squarely Over the Frame
Roll out your new screen material and cut it approximately 2 inches larger than the frame on all sides. Position the frame on top of the screen material, ensuring the weave of the screen runs parallel to the frame edges.
This alignment is critical—crooked screen material will create visible lines and may cause the screen to sag over time.
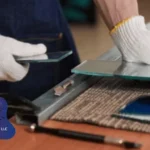
Step 4: Use a Spline Roller to Secure the New Mesh
This is the most critical step when learning how to repair a window screen. Work slowly to keep the screen taut but not overly stretched. Start with one long side of the frame:
- Begin at a corner and use the convex (curved out) wheel of your spline roller
- Roll the spline into the groove while gently pulling the screen material taut
- Work your way along the entire side without stopping
- Move to the opposite long side and repeat, pulling just tight enough to remove slack
- Finish with the two short sides
The screen should be tight enough that it doesn’t sag, but not so tight that it distorts the frame or creates excessive tension that could lead to tearing.
Getting the screen perfectly tight without causing wrinkles can be tricky. If you’re struggling, our Houston pros have the experience to guarantee a perfect finish every time. Book your repair today!
Step 5: Trim the Excess Mesh for a Clean, Professional Finish
Using a sharp utility knife, carefully trim the excess screen material. Cut along the outer edge of the spline, leaving about 1/8 inch of material beyond the spline for a professional appearance.
Make smooth, continuous cuts rather than short, choppy ones. A dull blade will pull and tear the screen material rather than cutting cleanly.
Step 6: Reinstall Your Repaired Screen and Enjoy a Bug-Free Home
Before reinstalling, check that your repair looks square and professional. The screen should be evenly tight across the entire surface with no wrinkles or loose spots.
Carefully place the screen back in your window frame. It should fit snugly without forcing. If it’s too tight or loose, you may need to adjust the screen tension or check your measurements.
Method 3: How to Repair a Window Screen Frame
Sometimes the mesh is perfectly fine, but the frame itself needs attention. Frame problems are often overlooked, but they’re usually easier to fix than you might think.
How to Straighten a Bent Aluminum Screen Frame
Bent frames are common, especially on screens that have been removed and stored improperly. Here’s how to straighten them:
What You’ll Need:
- Rubber mallet
- Wood blocks (2×4 scraps work well)
- Flat work surface
- Patience
The Process:
- Identify the bend location and severity
- Place the frame on a flat surface with the bend facing up
- Position wood blocks on either side of the bend for support
- Gently tap with the rubber mallet using light, even pressure
- Check progress frequently to avoid over-correcting
Warning: Aluminum frames can crack if bent too quickly or repeatedly. Work slowly and stop if you feel significant resistance.
How to Replace Broken Plastic or Metal Frame Corners
Corner breaks are frustrating but fixable. Most frame corners are designed to be replaceable:
- Remove the broken corner piece (may require gentle prying)
- Take the piece to your hardware store for matching
- Install the new corner by sliding it into place
- Test the fit before reassembling the entire screen
For complex breaks or sourcing specific parts, see our complete guide: The Ultimate Guide to Fixing Bent and Broken Window Screen Frames.
FAQ: Your Top Questions on How to Repair a Window Screen
What is the average cost for a professional vs. a DIY window screen repair?
Professional repair: $75-150 per screen for full replacement, $25-50 for simple patches DIY repair: $15-30 for materials to repair multiple screens, plus your time
The cost savings are significant, especially if you have multiple screens to repair. Most homeowners break even after repairing just 2-3 screens themselves.
Is it cheaper to repair or replace a whole window screen?
For screens with minor damage (small holes, loose spline), repair is always more economical. However, if your screen has multiple issues—torn mesh, bent frame, and worn spline—replacement might be more cost-effective in the long run.
Consider replacement when:
- Repair costs approach 70% of replacement cost
- The frame is severely damaged
- You’re upgrading to better materials anyway
How tight should the mesh be for a proper window screen repair?
The mesh should be taut enough to eliminate sag but not so tight that it distorts the frame. A good test: gently press the center of the screen with your palm. It should give slightly (about 1/4 inch) but spring back immediately.
Over-tightening is a common mistake that can:
- Distort the frame geometry
- Create stress points that lead to tearing
- Make the screen difficult to install
What are the most common mistakes people make when they first try to repair a window screen?
Based on our experience helping hundreds of DIY repairs, here are the top mistakes:
- Using the wrong spline size – This causes loose screens or damaged frames
- Cutting the screen material too small – Always start with extra material
- Rushing the spline installation – Take your time for professional results
- Not cleaning the frame groove – Debris prevents proper spline seating
- Over-tightening the mesh – This causes frame distortion and premature failure
Conclusion: Your Successful Window Screen Repair
You now have all the knowledge required to confidently repair any window screen in your home. Whether you chose a quick patch for a small hole or tackled a complete mesh replacement, you’ve learned a valuable skill that will save you money for years to come.
The techniques we’ve shared come from years of professional experience and have been proven effective on thousands of screens. Remember, the key to success is taking your time, using quality materials, and following the steps methodically.
Key Takeaways:
- Assess first – Choose the right repair method for your specific damage
- Invest in quality materials – Good screen mesh and spline last significantly longer
- Take your time – Rushing leads to mistakes and poor results
- Practice makes perfect – Your second screen will be easier than your first
While DIY screen repair is a rewarding project, we understand that life gets busy. For a fast, professional, and affordable solution, our Houston window screen repair team is here to help.
Get Your Free Window Screen Repair Quote Today!
Stop wasting money on constant screen repairs. Invest in a permanent solution that keeps your pets safe, your home pest-free, and your family comfortable year-round.
Our Houston-based team is ready to transform your home with premium pet resistant screen replacement services. We serve all of Greater Houston, including:
Contact Windows and Doors Repair LLC
(281) 595-0406
✉️ contact@windowsdoorsrepair.com
This guide represents current best practices as of 2025. Screen materials and tools continue to evolve, so always check manufacturer specifications for the most up-to-date installation requirements.